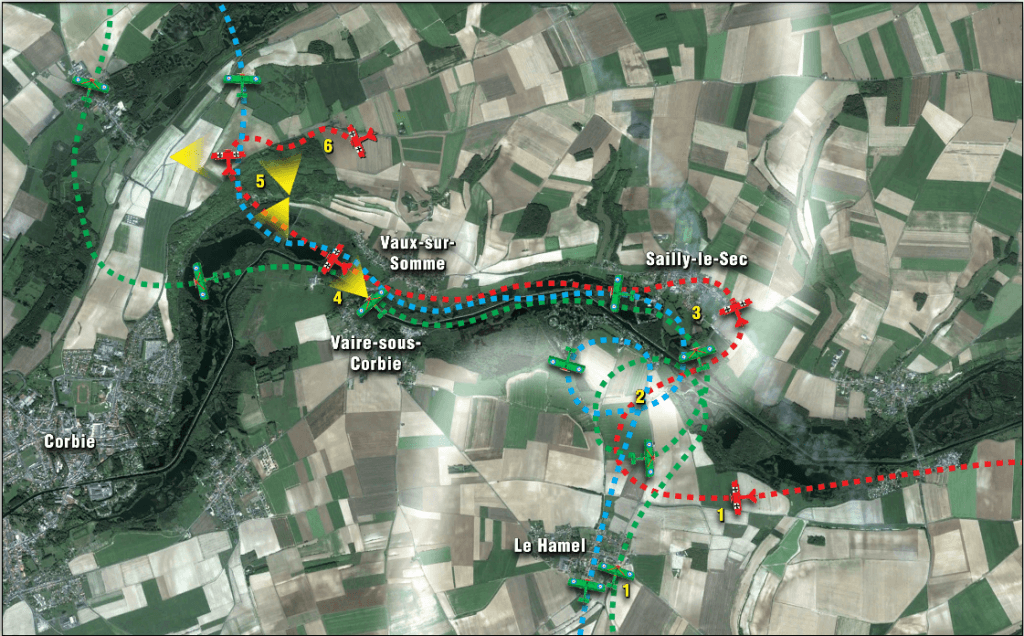
Last flight analysis by Don Hollway
Event ID: 688
21 April 1918
Source ID: 59
1: The Approach. A section of von Richthofen’s flight, approaching from the east along the Somme River, leads an attack on a pair of British reconnaissance planes northeast of Le Hamel. The Germans are fired on by Australian ack-ack guns. Brown’s patrol, approaching from the south with May on the “safe” west side, spots the smoke. They dive to the attack.
2: The Dogfight. In the ensuing tangle almost directly over the lines (light area) north of le Hamel, May (blue) disobeys Brown’s orders to stay out of the fight, but is too inexperienced to find a target. He does two complete circles, holding down his trigger and firing blind. Meanwhile Von Richthofen (red) stays above the fight, from where he can dive to attack the enemy or rescue one of his own.
3: The Pursuit. May’s guns overheat and jam. South of Sailly-le-Sec he breaks for home, west up the Somme valley. Von Ricthtofen spots him alone and dives to the attack. Brown in turn dives to the rescue. All three planes head up the valley. At this point von Richthofen has German territory just to his left and can easily break off the attack. However, the wind—unusually, blowing east-to-west—quickly carries him beyond the lines. (Planes are not shown to scale; map is about 4½ miles across from left to right.) May’s frantic weaving allows both the Baron and Brown to close the distance.
4: The Attack. Southwest of Vaux-sur-Somme (towns shown in this modern satellite view existed in April 1918, but only as shell-blasted ruins; artillery easily reached from one end of this view to the other), Brown plunges into range and gets off one burst (yellow). He believes the Baron looks around in surprise, then slumps in the cockpit. Actually one of von Richthofen’s guns is also jammed, and the other is firing only intermittently; he may have loosened his straps to reach forward and unjam them.
5: The Kill. Coming up on the bluff which turns the Somme south, May breaks right, up over the ridge, so low that his wheels touch the ground. Had von Richthofen turned after Brown, south, he would only have been 1½ miles behind enemy lines. Instead he follows May over the crest of the ridge—high ground occupied by trained Australian anti-aircraft crews. The triplane is taken under fire from multiple directions. A single bullet strikes von Richthofen in the right side.
6: The End. May and Brown rejoin and head off to the north. Struck in the heart, von Richthofen nevertheless manages to turn toward German lines, but is now 3½ miles from safe ground. He brings the triplane down to a semi-controlled landing in a beet field just south of the Bray-Corbie road. The impact snaps off the Fokker’s landing gear and—the Rittmeister having loosened his straps—slams his face on his gun butts. The triplane slews around facing the other way.

Comments (0)